How Do I Install Crown Molding On Kitchen Cabinets / Where To Install Crown Molding In Your Home : Once the cabinets are bought (or built) and installed your options are limited to the situation you have in front of you.
How Do I Install Crown Molding On Kitchen Cabinets / Where To Install Crown Molding In Your Home : Once the cabinets are bought (or built) and installed your options are limited to the situation you have in front of you.. Nail or glue the moulding to the wall and ceiling. Paint or stain to your preference. House flipping brothers dave and rich show how to install kitchen cabinet crown molding and trim with tips.this video covers all aspects of cabinet molding i. The only problem here is that when you are working with a full overlay door style, there isn't enough space at the front of the cabinet to nail the crown molding. If you're planning on installing the trim yourself as a diy project, keep this important tip.
Not only do you have to be aware of an inside corner, outside corner, right board, or left board, you also have to magically hold the crown molding up against your miter saw fence at just the right angle or else your corners will never fit together. For the front filler piece, drill from underneath the inside of the cabinet, and then secure that piece with wood screws. Be sure the pieces are tight against the wall. Measure and mark the front section of crown molding to the cabinet width. Cut a molding strip at least 8 inches longer than the length of the front of your cabinet.
11 Ways to DIY Kitchen Remodel! - Painted Furniture Ideas from paintedfurnitureideas.com Dry fit the crown molding by holding the front piece and a side piece against the front and side of the baseboard (image 1). If you are handy with a hammer and have an eye for design, installing crown molding on cabinets can be a fantastic diy project for the weekend. Mark all sides of the cabinet onto which you will be attaching crown moulding. And i only had exactly 6 feet of matching crown from the cabinet company. When installing the top of a cabinet, space the finish nails about 12 to 16 inches apart. But the bad news is it takes some practice, careful measurements, and perhaps an extra stick or two of crown molding. Cut the molding according to the measured length. The extra length will help push the cope joint closed when installing crown moulding.
That 6 foot piece of molding has been leaning against the bedroom wall for two full years (#keepingitrealwithkimsix).
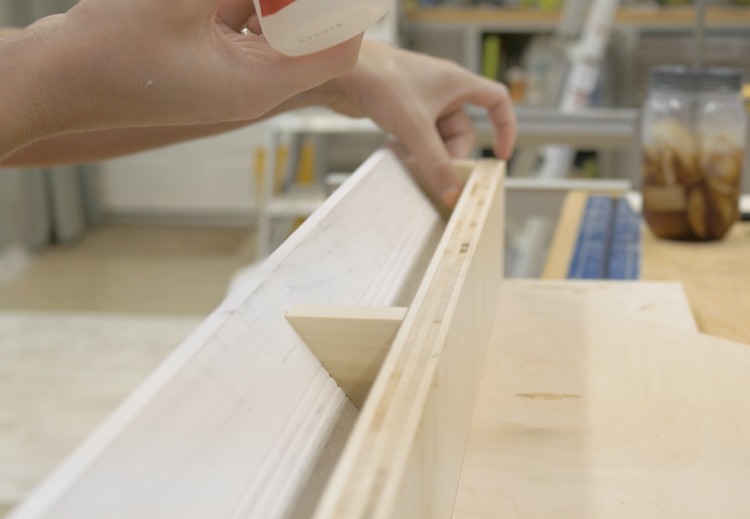
Be sure the pieces are tight against the wall. The molding also comes in handy for closing the gap between the top of the cabinets and the ceiling and for homeowners who want to create a sleek, finished look in their cook space. Hold up the crown molding on the sides of the cabinet. Using cabinets of varying heights or landscaping as. There is a simple solution. The crown molding will have to ability to 'float' or 'ride' up and down on the carrier molding. The extra length will help push the cope joint closed when installing crown moulding. The first piece needed is the carrier molding. Titebond no run, no drip wood glue provided by titebond. For more information, visit www.titebond.com. Secure the crown molding when installing on a wall, use the pneumatic nailer to secure the crown molding at the wall studs. With crown molding it seems like there are 10 considerations to make for every single cut. Using a nail gun, nail the crown to the baseboard.
And it was so easy, i had to share the secret with you. Miter the edge that meets the first strip of crown molding and hold the ends together. Unless there is ample room above the doors to attach a crown molding, or if you are using a very wide crown molding, you will need to install a nailer strip to support the installation. You will need to do a 2 piece molding application: Next the crown molding is attached to the carrier piece.
DIY Stacked Kitchen Cabinets - Frills and Drills from i0.wp.com Hold up the crown molding on the sides of the cabinet. House flipping brothers dave and rich show how to install kitchen cabinet crown molding and trim with tips.this video covers all aspects of cabinet molding i. Attach crown molding run a bead of glue along each piece of molding (image 1). How to install crown molding: Then, you will need to prep the baseboards and attach them in place. For more information, visit www.titebond.com. But thanks to kreg** i finally figure out how to do it. This piece is attached to the top of the cabinets.
Hold up the crown molding on the sides of the cabinet.
Not only do you have to be aware of an inside corner, outside corner, right board, or left board, you also have to magically hold the crown molding up against your miter saw fence at just the right angle or else your corners will never fit together. For the front filler piece, drill from underneath the inside of the cabinet, and then secure that piece with wood screws. To easily install crown molding around the cabinets on your ceiling, you'll first need to make sure that you have the necessary tools. The cabinets we chose have a full overlay door style, which means that the doors and drawer fronts cover almost all of the 1 3/4 cabinet frame. In this video we will go over some tips and tricks that might help whe. Crown mouldings on varying cabinet heights. Measure the length of the front and sides of your cabinet. Secure the crown molding when installing on a wall, use the pneumatic nailer to secure the crown molding at the wall studs. Miter that end of this strip and then attach it to the backing wood with the nail gun. Be sure the pieces are tight against the wall. You will need to do a 2 piece molding application: You can use 1 x 4 lumber, and rip these into two or three strips. Cut a molding strip at least 8 inches longer than the length of the front of your cabinet.
Provide a nailing surface for crown moulding by attaching solid wood mounting strips to the top edges of the cabinets. This piece is attached to the top of the cabinets. You will need to do a 2 piece molding application: Use a pin nailer to nail into the corners of the two pieces of crown molding (image 2). From the sides of the cabinet, nail the filler pieces in the place.
Cabinet Crown Molding » Rogue Engineer from rogueengineer.com Flex the moulding in place. Unless there is ample room above the doors to attach a crown molding, or if you are using a very wide crown molding, you will need to install a nailer strip to support the installation. Cut a molding strip at least 8 inches longer than the length of the front of your cabinet. If you are handy with a hammer and have an eye for design, installing crown molding on cabinets can be a fantastic diy project for the weekend. Titebond no run, no drip wood glue provided by titebond. The only problem here is that when you are working with a full overlay door style, there isn't enough space at the front of the cabinet to nail the crown molding. And i only had exactly 6 feet of matching crown from the cabinet company. Miter that end of this strip and then attach it to the backing wood with the nail gun.
Place the crown molding at the top of the riser so it touches the ceiling and nail it in place to the riser (image 2).
To easily install crown molding around the cabinets on your ceiling, you'll first need to make sure that you have the necessary tools. But the bad news is it takes some practice, careful measurements, and perhaps an extra stick or two of crown molding. And it was so easy, i had to share the secret with you. Make a square cut on the uncoped end of the crown moulding. For the front filler piece, drill from underneath the inside of the cabinet, and then secure that piece with wood screws. Once the cabinets are bought (or built) and installed your options are limited to the situation you have in front of you. So you've reached the end of your cabinet installation and are looking for the best method of installing crown on cabinets. This piece is attached to the top of the cabinets. Check out our video review and demo of adding crown molding to your kitchen cabinets. Secure the crown molding when installing on a wall, use the pneumatic nailer to secure the crown molding at the wall studs. Cut a molding strip at least 8 inches longer than the length of the front of your cabinet. Place the crown molding at the top of the riser so it touches the ceiling and nail it in place to the riser (image 2). Cabinet crown mouldings are the finishing touch for a kitchen renovation but you need to plan for them early in the project.